
How to Propagate Ivy Quickly and Easily for Stunning Results – Embark on a journey to cultivate lush, verdant ivy with ease, transforming your home or garden into a breathtaking sanctuary. This comprehensive guide unravels the secrets of ivy propagation, empowering you to create stunning displays of foliage with minimal effort.
From understanding the different types of ivy and their propagation methods to mastering the art of nurturing young plants, this guide equips you with the knowledge and techniques to achieve flourishing ivy growth.
Whether you’re a seasoned gardener or a novice green thumb, this step-by-step approach simplifies the process of propagating ivy, ensuring success at every stage. Explore the diverse methods of propagation, including cuttings, layering, and division, and discover the essential tools and materials needed to embark on your ivy propagation journey.
With meticulous care and attention, you’ll witness the transformation of simple cuttings into thriving ivy plants, adding a touch of elegance and natural beauty to your surroundings.
Understanding Ivy Propagation
Ivy propagation is a simple and rewarding process that allows you to easily expand your collection of these versatile plants. By understanding the basics of ivy propagation, you can create new plants from cuttings or layering, resulting in a flourishing garden or indoor space.
Transforming a single ivy cutting into a lush, vibrant display is simpler than you might think. Discover the secrets to quick and easy propagation with our comprehensive guide, The Easiest Methods for Propagating Ivy Revealed – Start Growing Today! , and unlock the potential for stunning results in your garden or home.
Whether you’re a seasoned gardener or a novice, this guide will equip you with the knowledge and techniques to effortlessly propagate ivy and enjoy its beauty for years to come.
Types of Ivy Commonly Propagated
Ivy propagation is a versatile technique that can be applied to various ivy species. The most common types of ivy propagated include:
- English Ivy (Hedera helix) : This classic ivy is known for its dark green, lobed leaves and its ability to climb and cover walls. It is a popular choice for groundcover and vertical landscaping.
- Boston Ivy (Parthenocissus tricuspidata) : This vigorous vine features three-lobed leaves that turn brilliant crimson in fall. Boston ivy is a popular choice for covering walls and fences.
- Algerian Ivy (Hedera canariensis) : This ivy boasts large, glossy leaves and a fast growth rate. It is often used for groundcover and container plantings.
- Irish Ivy (Hedera hibernica) : This ivy species is similar to English ivy but features larger leaves and a faster growth rate. It is also a popular choice for groundcover and vertical landscaping.
Benefits of Propagating Ivy
Propagating ivy offers numerous benefits for gardeners and plant enthusiasts:
- Cost-effective: Propagating ivy allows you to create new plants without spending money on expensive nursery stock.
- Increased Variety: Propagation allows you to expand your ivy collection by creating new plants from existing varieties.
- Easy and Accessible: Ivy propagation is a relatively simple process that requires minimal tools and materials.
- Sustainable Practice: Propagating ivy is a sustainable practice that promotes plant diversity and reduces the need for new plant purchases.
Best Time of Year to Propagate Ivy
The best time to propagate ivy is during the spring and summer months when the plant is actively growing. This is when the cuttings have the highest chance of rooting successfully.
Methods for Propagating Ivy

Ivy propagation is a rewarding process that allows you to create new plants from existing ones. Whether you’re looking to fill a bare wall, add greenery to your garden, or simply enjoy the satisfaction of growing your own plants, ivy propagation is a simple and effective technique.
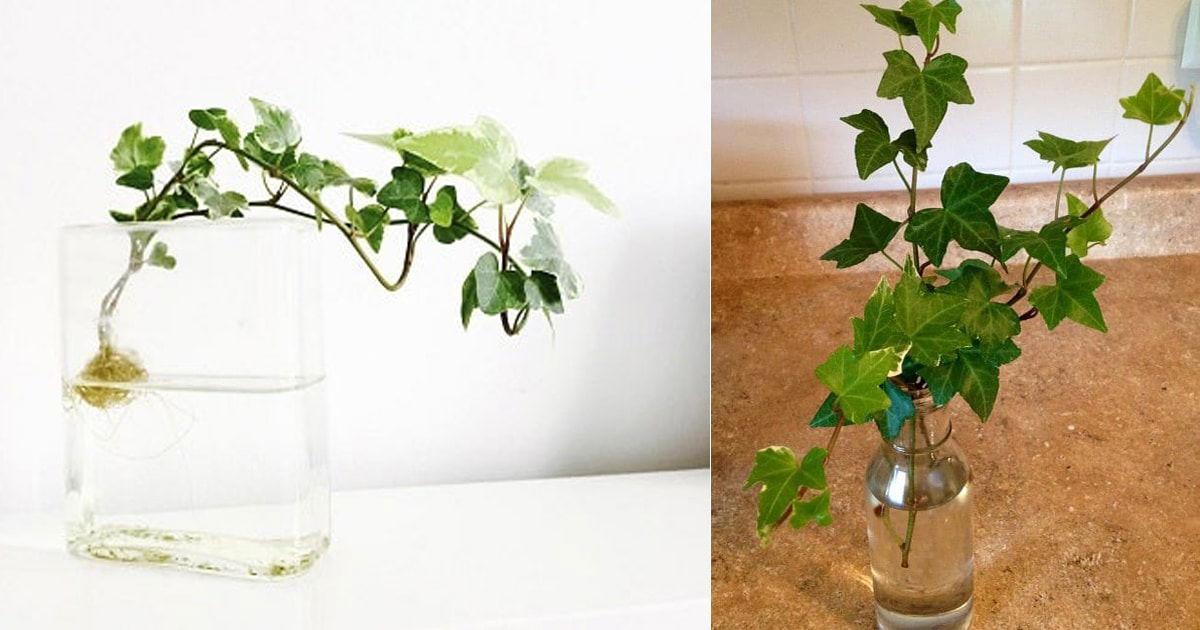
Propagation Through Cuttings
Propagating ivy through cuttings is a straightforward and commonly used method. Cuttings are sections of the plant that are removed and encouraged to develop roots. Here’s a step-by-step guide for propagating ivy through cuttings:
- Select Healthy Cuttings: Choose healthy, non-flowering stems from your ivy plant. The ideal cutting length is around 4-6 inches, with at least 3-4 leaf nodes. A leaf node is the point on the stem where leaves grow.
- Prepare the Cuttings: Using a sharp knife or pruning shears, make a clean cut just below a leaf node. Remove the lower leaves from the cutting, leaving the top 2-3 leaves intact. This encourages root growth at the base of the cutting.
- Prepare the Growing Medium: Fill a small pot or tray with a well-draining potting mix. You can also use a mixture of peat moss and perlite for optimal results.
- Plant the Cuttings: Make a small hole in the potting mix and insert the prepared cutting, ensuring that the bottom node is buried in the soil. Gently firm the soil around the cutting.
- Water and Provide Humidity: Water the cuttings thoroughly and create a humid environment by covering the pot with a plastic dome or bag. This helps to retain moisture and encourage root development.
- Provide Indirect Light: Place the pot in a location with indirect sunlight. Avoid direct sunlight, which can scorch the delicate cuttings.
- Maintain Moisture: Keep the potting mix consistently moist, but avoid overwatering. Water when the top inch of soil feels dry to the touch.
- Roots Development: Roots will typically develop within 4-6 weeks. You can gently tug on the cutting to check for resistance, indicating root formation. Once roots have formed, you can gradually acclimate the cuttings to their new environment by removing the plastic dome or bag.
Comparing Propagation Methods
Various methods can be used to propagate ivy. Here’s a comparison of the effectiveness of different propagation methods:
Method |
Effectiveness |
Pros |
Cons |
|---|---|---|---|
Cuttings |
High |
Easy to perform, requires minimal equipment, relatively quick results |
Can be susceptible to fungal infections, requires consistent moisture |
Layering |
Moderate |
High success rate, minimal effort required, ideal for larger plants |
Can take longer than cuttings, may require more space |
Division |
Moderate |
Simple and quick, ideal for established plants |
May damage the parent plant, requires careful handling |
Air Layering Ivy
Air layering is a technique that involves encouraging roots to develop on a stem while it’s still attached to the parent plant. This method is particularly effective for ivy and can be used to create new plants from existing stems.
- Select a Stem: Choose a healthy, mature stem on your ivy plant. The stem should be about 1/2 inch in diameter and at least 6 inches long.
- Make a Cut: Using a sharp knife, make a circular cut around the stem about 1 inch below a leaf node. This cut should be about 1/2 inch deep.
- Remove Bark: Carefully scrape away the bark from the cut area, exposing the cambium layer. This layer is responsible for root growth.
- Apply Rooting Hormone: Apply a rooting hormone powder or gel to the exposed cambium layer. This encourages root development.
- Wrap with Sphagnum Moss: Wrap the cut area with moist sphagnum moss, ensuring it’s tightly packed and covers the entire cut area. Secure the moss with plastic wrap or aluminum foil.
- Maintain Moisture: Keep the sphagnum moss moist by regularly misting it with water. You can also place a plastic bag over the moss to create a humid environment.
- Roots Development: Roots will typically develop within 6-8 weeks. You can check for root growth by gently poking a finger through the moss. Once roots have formed, you can cut the stem below the air layer and pot it in a suitable container.
Essential Tools and Materials
To successfully propagate ivy, you’ll need a few essential tools and materials. Having the right equipment ensures a clean and efficient process, maximizing your chances of success.
Sterility is crucial when propagating plants, as it helps prevent the introduction of harmful bacteria and fungi that can hinder growth. Using sterile tools and pots minimizes the risk of infection and ensures a healthy start for your new ivy plants.
Sterile Tools and Pots
Sterile tools are essential for preventing the spread of diseases and promoting healthy plant growth. Here’s a list of tools and their importance:
- Sharp Pruning Shears:These are used for making clean cuts on the ivy stems, reducing the risk of damage and promoting faster root development. Sterilize them before and after use with rubbing alcohol or a bleach solution.
- Sharp Knife or Razor Blade:A sharp knife or razor blade is useful for making precise cuts on the ivy stems for rooting. Sterilize these tools with rubbing alcohol or a bleach solution before and after use.
- Sterile Pots:New pots or thoroughly cleaned and disinfected old pots are essential for providing a clean and disease-free environment for your ivy cuttings. Wash pots with soap and water, then rinse them thoroughly. Disinfect them with a bleach solution (1 part bleach to 9 parts water) and allow them to air dry completely.
Selecting the Right Potting Mix, How to Propagate Ivy Quickly and Easily for Stunning Results
The potting mix plays a crucial role in providing the necessary nutrients and drainage for your ivy cuttings to thrive. Choose a well-draining potting mix that’s specifically designed for cuttings or seedlings.
- Well-Draining Potting Mix:A well-draining potting mix prevents waterlogging, which can lead to root rot. Look for mixes containing perlite, vermiculite, or coco coir, which improve drainage and aeration.
- Nutrient-Rich Potting Mix:Ivy cuttings need a nutrient-rich potting mix to support their growth. Choose a mix that contains essential nutrients like nitrogen, phosphorus, and potassium.
- Sterile Potting Mix:It’s essential to use a sterile potting mix to minimize the risk of introducing harmful bacteria and fungi to your ivy cuttings. Look for potting mixes that are specifically labeled as sterile.
Caring for Propagated Ivy
Newly propagated ivy plants are delicate and require specific care to ensure they thrive and develop into healthy, mature vines. Providing the right growing conditions, including adequate light, humidity, and proper watering and fertilizing, is crucial for their successful establishment.
Ideal Growing Conditions for Newly Propagated Ivy
Newly propagated ivy plants require a warm, humid environment with bright, indirect light. Avoid direct sunlight, as it can scorch the delicate leaves. A well-draining potting mix is essential to prevent root rot.
Watering and Fertilizing Young Ivy Plants
Watering newly propagated ivy is crucial for its growth and development.
- Water the plant thoroughly when the top inch of soil feels dry to the touch.
- Avoid overwatering, as this can lead to root rot.
- Allow the soil to dry slightly between waterings.
Fertilizing young ivy plants is important for their healthy growth.
- Use a balanced liquid fertilizer diluted to half strength every two weeks during the growing season (spring and summer).
- Avoid over-fertilizing, as this can burn the roots.
- Reduce fertilization during the winter months when the plant is dormant.
Providing Adequate Light and Humidity
Newly propagated ivy plants thrive in bright, indirect light.
- Place them near a window that receives plenty of sunlight, but avoid direct sunlight.
- Rotate the plant regularly to ensure even growth on all sides.
Maintaining adequate humidity is crucial for newly propagated ivy.
- Place the plant on a pebble tray filled with water to increase humidity.
- Mist the leaves regularly with water, especially during dry conditions.
Troubleshooting Common Issues
While propagating ivy is generally straightforward, certain challenges can arise. Understanding common problems and their solutions can help ensure successful propagation. This section will guide you through troubleshooting common issues encountered during ivy propagation.
Root Rot
Root rot is a common problem that can occur when ivy cuttings are overwatered or planted in poorly draining soil. Overwatering leads to excess moisture, creating an environment conducive to fungal growth, which can damage roots.
- Signs of Root Rot: Wilting, yellowing leaves, stunted growth, and a foul odor emanating from the soil are indicative of root rot.
- Solutions:
- Repot the cutting in fresh, well-draining soil. Ensure the new pot has drainage holes.
- Allow the soil to dry out completely between waterings.
- Consider using a fungicide to treat the affected cutting.
- Prevention:
- Use a well-draining potting mix, such as a mix of peat moss, perlite, and vermiculite.
- Avoid overwatering. Allow the soil to dry out slightly between waterings.
Fungal Diseases
Fungal diseases can affect ivy cuttings, particularly in humid environments. These diseases can cause leaf spots, wilting, and even stem rot.
- Signs of Fungal Diseases: Leaf spots, powdery mildew, and brown or black lesions on stems are common signs.
- Solutions:
- Remove affected leaves or stems and dispose of them properly to prevent further spread.
- Treat the cutting with a fungicide specifically designed for ivy.
- Improve air circulation around the cutting to reduce humidity.
- Prevention:
- Use clean tools and pots to prevent the spread of fungal spores.
- Avoid overwatering and ensure good drainage.
- Provide adequate air circulation around the cutting.
Pests
Ivy cuttings can be susceptible to pests such as aphids, mealybugs, and spider mites. These pests can damage leaves and hinder growth.
- Signs of Pests: Small insects, sticky residues, webbing, and discolored leaves are indications of pest infestations.
- Solutions:
- Remove pests manually by wiping them off with a damp cloth or cotton swab.
- Use insecticidal soap or neem oil to control pests.
- Introduce beneficial insects like ladybugs to help control pest populations.
- Prevention:
- Inspect cuttings regularly for signs of pests.
- Maintain good hygiene practices, including cleaning tools and pots regularly.
Stunning Results with Ivy: How To Propagate Ivy Quickly And Easily For Stunning Results

Propagating ivy is not only rewarding but also incredibly versatile. The abundance of ivy you’ll create can be used in various ways, transforming your home and garden into stunning, verdant oases. Let’s explore the endless possibilities of using propagated ivy.
Looking to quickly and easily create stunning ivy displays? Propagating ivy is a simple and rewarding process, whether you’re aiming for a lush, green haven indoors, as outlined in How to Propagate Ivy Indoors: Create a Lush, Green Haven , or adding vibrant greenery to your outdoor spaces.
With a few basic techniques, you can quickly cultivate new ivy plants and enjoy their beauty in no time.
Creative Uses for Propagated Ivy
Propagated ivy offers a world of creative possibilities for both indoor and outdoor spaces. From elegant home decor to breathtaking landscaping features, ivy can add a touch of natural beauty and vibrancy to any environment.
- Living Walls and Vertical Gardens:Ivy’s trailing nature makes it an ideal choice for creating stunning vertical gardens. Its lush foliage can transform bare walls into vibrant green spaces, adding a touch of nature to urban settings. Imagine a living wall cascading down your home’s exterior, providing a natural screen for privacy and adding visual interest.
- Hanging Baskets and Planters:Ivy’s cascading growth habit makes it perfect for hanging baskets and planters. Drape it over the edges of containers, creating a lush and flowing display. Use ivy to create a vibrant green canopy over a patio or balcony, adding a touch of natural beauty to your outdoor space.
- Groundcover and Landscaping:Ivy can be used as a groundcover to suppress weeds and add a touch of green to your landscape. It can also be used to create a lush, flowing carpet beneath trees and shrubs. Consider using ivy to create a natural border along pathways or to soften the edges of hardscapes.
- Indoor Decor:Propagated ivy can add a touch of nature to your home. Place it in hanging planters, on shelves, or in decorative pots to create a lush and inviting atmosphere. Consider using ivy to create a green oasis in your living room, bedroom, or office.
Ivy’s ability to purify the air can create a healthier and more pleasant indoor environment.
Ivy Varieties and Their Characteristics
The world of ivy is diverse, offering a range of varieties with unique characteristics and appearances. Choosing the right ivy for your needs depends on your desired aesthetic, growing conditions, and intended use.
Ivy Variety |
Characteristics |
Uses |
|---|---|---|
English Ivy (Hedera helix) |
Fast-growing, tolerant of shade, classic dark green leaves with distinct lobes. |
Groundcover, vertical gardens, hanging baskets, indoor decor. |
Irish Ivy (Hedera hibernica) |
Similar to English ivy but with larger, more rounded leaves and a faster growth rate. |
Groundcover, vertical gardens, hanging baskets, indoor decor. |
Boston Ivy (Parthenocissus tricuspidata) |
Vigorous climber with large, three-lobed leaves that turn vibrant shades of red in autumn. |
Vertical gardens, covering walls and fences, climbing structures. |
Algerian Ivy (Hedera canariensis) |
Large, glossy leaves with prominent veins, tolerant of warmer climates. |
Groundcover, hanging baskets, indoor decor. |
Swedish Ivy (Plectranthus verticillatus) |
Not a true ivy but a popular houseplant with trailing stems and vibrant green leaves. |
Indoor hanging baskets, decorative planters. |
Inspiring Ideas for Vertical Gardens and Hanging Baskets
Vertical gardens and hanging baskets offer a unique and captivating way to display propagated ivy. These spaces allow for creative design and can transform any environment with their cascading beauty.
- Layered Vertical Gardens:Create a multi-layered vertical garden with different ivy varieties, each with its unique foliage and growth habit. Combine English ivy with its classic green leaves, Boston ivy with its vibrant autumn colors, and Algerian ivy with its large, glossy leaves for a captivating display.
- Hanging Baskets with Ivy Combinations:Combine ivy with other trailing plants for a diverse and vibrant display. Pair ivy with cascading ferns, trailing begonias, or cascading petunias for a beautiful and lush arrangement. Consider using different ivy varieties within a single basket for added texture and visual interest.
- Geometric Shapes in Vertical Gardens:Create geometric shapes in your vertical gardens using ivy. Train ivy to grow in a grid pattern, a spiral, or a wave shape for a unique and modern aesthetic. Use trellises, wires, or other structures to guide the ivy’s growth and create the desired form.
- Ivy Walls for Privacy and Shade:Use ivy to create a living wall for privacy and shade. Train ivy to grow on a trellis or fence, creating a natural barrier that provides privacy and reduces noise pollution. Consider using ivy to create a green oasis in your backyard or on your balcony, offering a cool and inviting space to relax and enjoy nature.
Final Review
Unlock the potential of ivy propagation and create a captivating tapestry of foliage that enhances your home or garden. By following these expert tips and techniques, you’ll master the art of cultivating ivy, transforming your space into a verdant paradise.
From the initial stages of propagation to nurturing young plants, this guide provides a comprehensive roadmap for success. With patience and a touch of green thumb magic, you’ll witness the remarkable growth of your propagated ivy, adding a touch of natural beauty and vibrancy to your surroundings.
FAQs
What are the best types of ivy for propagation?
English ivy (Hedera helix) and Boston ivy (Parthenocissus tricuspidata) are popular choices for propagation due to their adaptability and ease of rooting.
Can I propagate ivy from seed?
While possible, propagating ivy from seed is a lengthy process and not as commonly used as cuttings or layering.
How long does it take for ivy cuttings to root?
Ivy cuttings typically take 4-6 weeks to develop roots, depending on the propagation method and environmental conditions.
What are the signs of a healthy propagated ivy plant?
A healthy ivy plant will exhibit vibrant green foliage, strong stem growth, and a well-developed root system.
